Grid-Based Movement in a Top-Down 2D RPG With Phaser 3

Classic 2D top-down RPGs often come with a movement that is grid-based. That means that your player can either walk a whole tile in the grid or not walk at all. It is not possible by design to walk part of a tile. Imagine a chessboard. A chess piece can only be on one field at a time. This article shows how you can implement such a movement with Phaser 3 and TypeScript.
Please note that I bundled the functionality described in this article into a Phaser 3 plugin.
Pixel Position vs. Tile Position
The Phaser arcade physics engine already provides everything we need to implement a 2D movement that is pixel based. However, we wish that the player is only able to move whole tile distances. In our example this will be multiples of 48 pixels. Therefore it will always be clear on which tile of the map the player is positioned and which are the neighboring tiles. This allows us to logically see the coordinates of game items in a tile grid coordinate system. So instead of saying “the player is currently located at position x = 159 pixels and y = 252 pixels” we can simply say “the player is currently located at position x = 3 and y = 4” meaning the third tile from the left and the fourth tile from the top. We will call the first pixel position and the second tile position.
How do we achieve this? Well, the high level algorithm is quite simple. However, the details get a little more involved.
Movement happens on a grid with a predefined tile size. Once a movement is started, the player will move 1 tile in an animation. Further movement is blocked while there is still a movement in progress.
Set Up the Game in TypeScript
If you prefer to use Phaser with just JavaScript feel free to skip this section. This article is not about optimally setting up a Phaser game with webpack and TypeScript. Therefore I will only give you a minimal set up.
- Set up your new project:
npm init - Add the following dev-dependecies to your
package.json:
3. Add phaser:
4. Run npm install
5. Add a tsconfig.json file to the root of your project directory with the following content:
6. Add a webpack.config.js file to the root of your project directory with the following content:
7. Add the following to the scripts section of your package.json:
8. Add an index.html file to the root of your project directory with the following content:
9. Create a src directory and add a file called main.ts with the following content to it:
Create Tilemap with Tiled
Let’s create a tilemap from some pretty game assets. We will use a free tileset that is part of the Time Fantasy assets package. To generate a tilemap from it we use the free level editor Tiled:
- Download Cloud City Tileset
- Download Tiled Map Editor
After downloading and unzipping the cloud city tileset, create an assets folder next to your src directory and copy the cloud_tileset.png file to it.
Open Tiled and click onNew Map…:

Make sure that the map size is 20 tiles in width and height and the tile size is 16px each:

Select JSON as the file format, name your file cloud-city.json and save it to your assets directory:

The Editor is now showing an empty map. Click on New Tileset… in the lower right corner:

Afterwards enter “Cloud City” as the name for our tileset and select the cloud_tileset.png file from the previously downloaded cloud city tileset. Make sure that the tile width and tile height are set to 16px, the Embed in map checkbox is ticked and click “ok”.

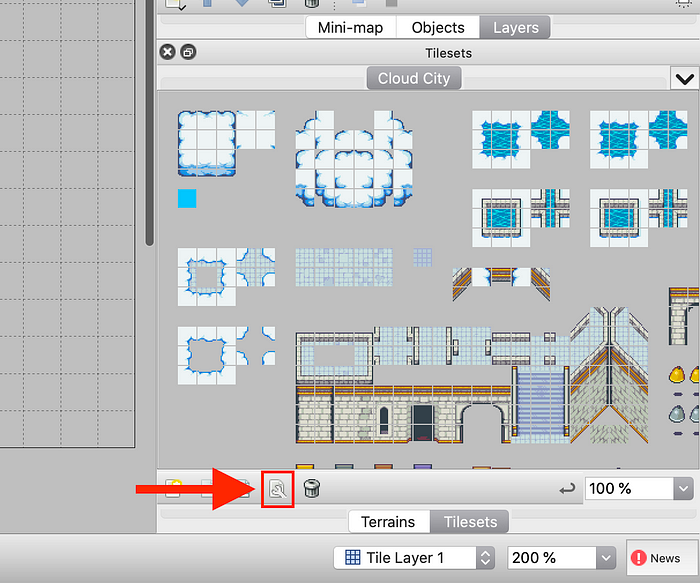
Now you should see the tileset on the lower right corner of the editor. Let’s now define which tiles will cause collisions. Click on the edit tileset icon:
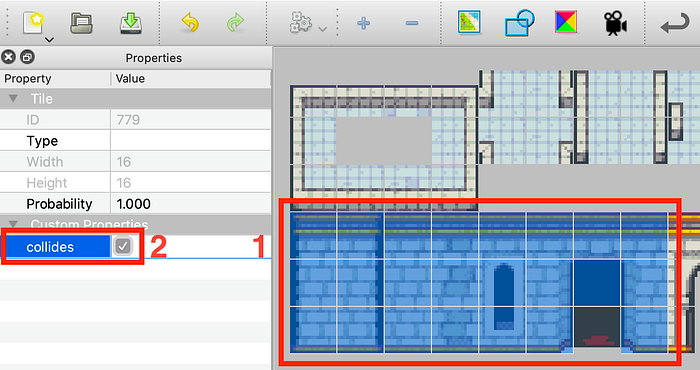
In the next screen mark all the tiles with Cmd/Crtl + a and click on the add property icon in the lower left corner:

Name the property collides, select bool as the type and click OK:

Now we can select those tiles that we want the player to collide with. In other words the tiles that we don’t want the player to walk on. For instance, we don’t want the player to walk through walls. First select the tiles and then tick the collides checkbox on the left:
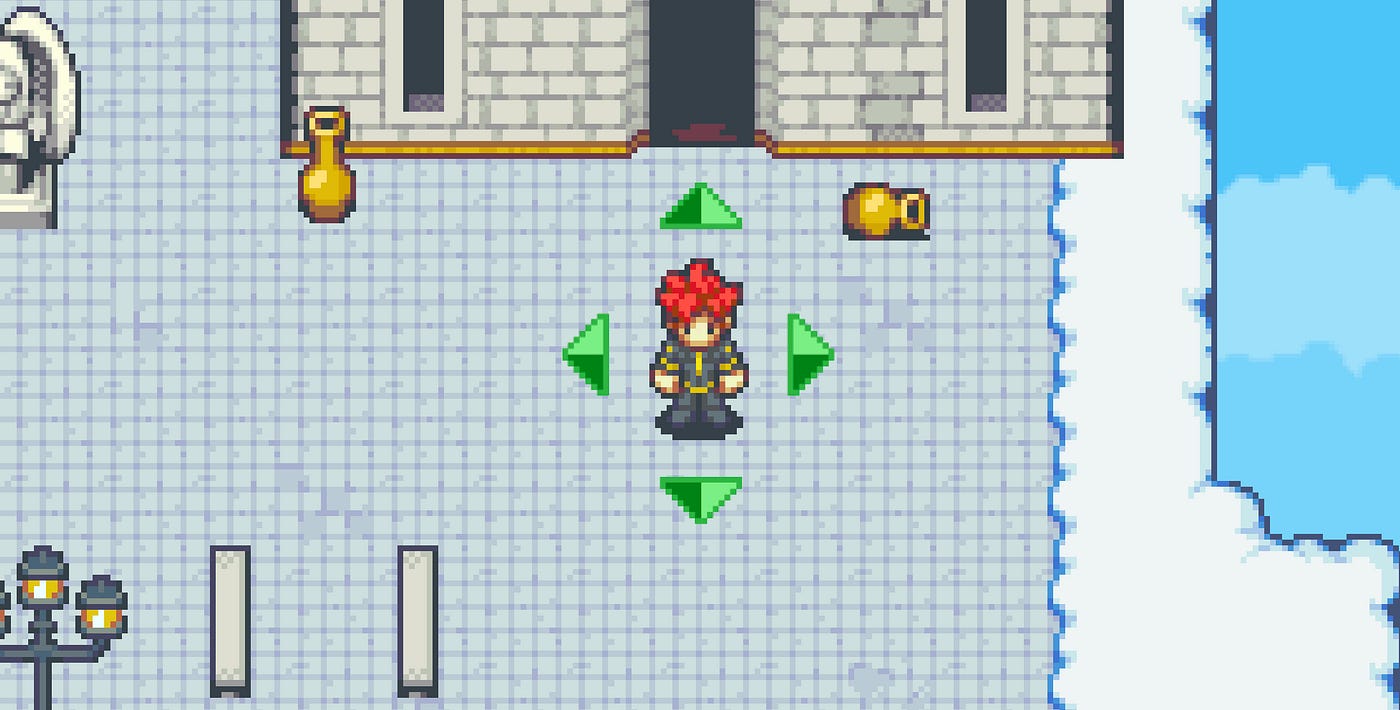
After saving the tileset we can finally start “painting” our map. Note that this will be done in layers. For those of you who are familiar with graphic editing software like Adobe Photoshop, Gimp or Affinity Photo, the layer concept should ring a bell. For our map we will use 4 layers. 3 Layers will be below the player and the fourth layer will be rendered on top of the player. Why do we need a layer on top of the player? There will be some tiles that we want to be in front of the player to create a more realistic experience. The following picture should give a good example:

Look at how the lantern is rendered in front of the player. The other 3 layers are needed for showing items on top of other items like the jug that is shown in front of the tile of the house which is shown in front of the paving stones:

How many layers exactly you need may depend on your use case.
In Tiled you can see all layers on the right in the Layers panel. There is already one layer by default, that is called Tile Layer 1. Double click it and rename it to ground. After that add a new layer by clicking the New Layer icon:

Just draw any map that you like. See my example of a 4-layer map:

Next we need to load the tilemap in our game. Add the following to your preload() method:
We need to load the tilemap and the image that represents the tileset. In the create() method we create a tilemap from the loaded JSON file, connect it to the tileset image and add all 4 layers. We set the depth of each layer, so that our player can later appear between the correct tile layers. Additionally we scale the tileset by factor 3 so the map will be rendered larger on our screen. Since the tileset has a tile size of 16x16 pixels, our scaled tile size will be (16*3)x(16*3) = 48x48 pixels.
If we start our game now by running npm run dev and navigate to http://localhost:8080 we should see the following in our browser:

Movement
This section will cover the tile based movement that claims to be the core of this article.
Let us first add a yet unanimated player to implement our movement. We will come back to collisions and player animations later. We are using a free player sprite from the time fantasy game assets: Download Free Player Sprites.
There is one problem with it: the characters image is scaled up by a factor of 2. That means that each pixel is actually represented by 4 pixels:

You can either scale it down by yourself or use my scaled down version of it: https://github.com/Annoraaq/grid-movement/blob/master/assets/characters.png
The single frames of the character sprites have a width of 26 pixels and a height of 36 pixels.
Before we create our player, let’s add a constant for our scaled tile size to the main.ts file:
Create a file Player.ts with the following content.
tilePos defines the starting position of the player on our tilemap in grid coordinates. We use it to set the player sprite to the correct position.
To get the position in pixels we need to multiply the starting position with the tile size and add an offset to it. But before we set these values, we need to set the correct origin. This needs some further explanation. If we position something in Phaser, it is positioned based on its origin. By default this is the center of the object. In our example the origin would be the center of our player sprite. It is expressed with two numerical values: originX and originY, which are both in the range from 0 till 1. The center of an object is represented with originX = 0.5 and originY = 0.5. The following image demonstrates a couple of origin values for our player sprite:
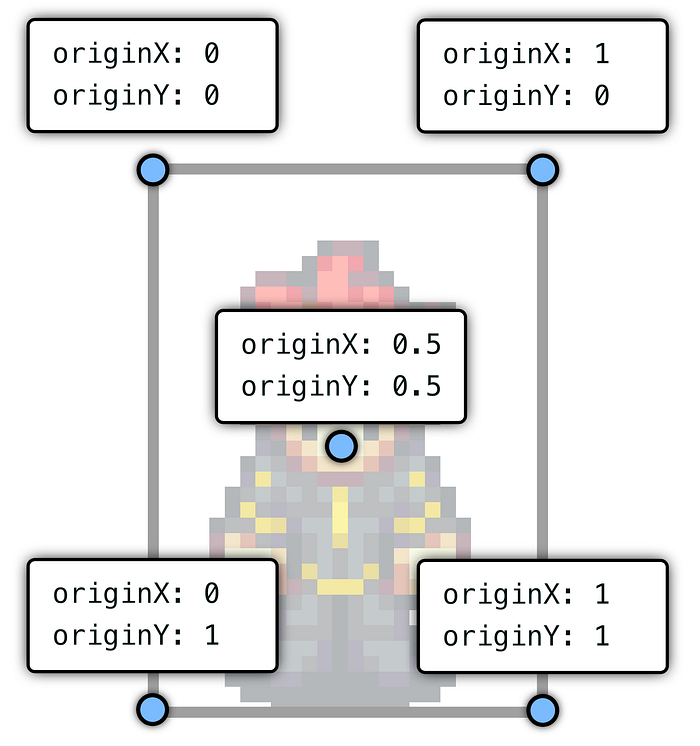
Why did we pick an offset of originX = 0.5 and originY = 1? On the x-axis we want to center our player, but on the y-axis we would like to align the bottom of the player with the bottom of the tile. On the x-axis we place the center of the sprite (originX = 0.5) at the center of the tile (offsetX = GameScene.TILE_SIZE / 2). On the y-axis we place the bottom of the sprite (originY = 1) at the bottom of the tile (offsetY = GameScene.TILE_SIZE).

Next we scale the sprite by the previously mentioned scale factor and set its start frame, which is 55 (starting at 0) in our case. You can also take any other frame if you like.
We need to preload our downloaded player sprite:
Let’s now add our player sprite and set the corresponding depth such that it appears between tile layers 3 and 4. We also set the sprite’s scale factor here.
Further we configure the main camera to follow the player sprite. This will be important when we move the player later. This saves us some logic, because otherwise we would need to move the map (and everything on top of it) instead of the player. Moving the player, however, is much more intuitive. Additionally we enable the roundPixels property of the camera. This will avoid ugly rendering issues when moving our player by fractions of a pixel.
Finally we create an instance of our Player class, initiating it with the player sprite and the tile coordinates of the player’s starting position.
If we run the game now we will see the player but can’t move it yet.

Move the player
In order to move we need methods that help changing the player’s position:
getPosition() will return the player’s pixel position. Why are we calling getBottomCenter() on the sprite? Remember the origin that was explained before? We chose originX = 0.5 and originY = 1 which placed the origin to the bottom center of our sprite. Therefore, to get the position of that origin, we call getBottomCenter() on the sprite.
To set the position, we simply delegate to the setPosition() method of the sprite. It will take the current origin of the object into account.
Before we implement the movement we create an enum for directions in our 2D grid world. Create a file Direction.ts with the following content:
GridControls
We will create a GridControls class that is responsible for handling the user input and telling our soon to be created physics engine what to do. That GridControls class will get an instance of our physics engine that we call GridPhysics.
On every update of the Phaser 3 game engine we will check for pressed cursor keys and start a movement in the corresponding direction.
GridPhysics Skeleton
Before we dive into the grid physics engine, let us create a file GridPhysics.ts holding a skeleton with the needed public methods:
movePlayer() will communicate a movement intention to the engine. The engine will then decide what to do with this information. We already saw that this method is called on every update if a corresponding key is pressed. So it is ok to repeatedly provide a movement intention. They will not queue up.
The update() method takes a delta value (that will be explained shortly) provided by Phaser and will be called on every GameScene update. This is where the actual movement will happen later.
We wire the GridControls and GridPhysics classes as follows in our main.ts:
It is as easy as creating both instances in the create() method and calling their update() methods in Phasers update() hook. Phaser calls the update method with two arguments: time and delta. While time represents the current time, delta is specified as “The delta time in ms since the last frame”. We will see later why we need this value.
Grid Physics
Movement on a 2D surface can best be described with two-dimensional vectors. Phaser 3 already offers a Vector2 class with x and y coordinates and many useful calculations. Therefore we will take advantage of that Vector2 class a lot in our implementation.
Let’s first take a look at the movePlayer() method of our physics engine. Whenever this method is called, the engine checks if there is already an ongoing movement. If so, nothing happens until that movement has finished. That ensures that you can’t change direction until the player has not walked a distance of at least one tile. If there is no ongoing movement, a new one is started by setting a movement direction.
We keep a variable movementDirection holding the current movement direction of the player, while a value of Direction.NONE means that the player is not moving.
Our update() method contains a similar logic:
If the player is moving it will update his position.
Let’s take a first look at updatePlayerPosition():
As a parameter we give the delta in milliseconds since the last update. This will be provided to us by Phaser and the exact number depends on the frames per seconds of the machine. Therefore we can’t simply add a fix speed value to the position of our player, unless we want the player to move with different speeds on different machines. We need to update the position of the player with respect to the passed milliseconds since the last update. We use the helper method getPixelsToWalkThisUpdate() for that.
We need a constant speedPixelsPerSecond that will determine how many pixels are added to the current player position per second. This will eventually manifest as the speed of the player moving on our map.
Change Sprite Position
Let’s finally come to the first real movement. We now know when, where and how far to move. So it is time for the movement.
With movementDirectionVectors we create a mapping between our Direction enum and their representations in the 2-dimensional vector space. Phaser 3 already offers predefined Vector2 objects for this case. These vectors are of the following shape:
- Vector2.UP: (x = 0, y = -1)
- Vector2.DOWN: (x = 0, y = 1)
- Vector2.LEFT: (x = -1, y = 0)
- Vector2.RIGHT: (x = 1, y = 0)
These vectors are special because of their following mathematical property: if we add a multiple of one of these vectors to any position in our coordinate system (which is also a vector), we will get a new vector that is shifted in exactly the corresponding direction. So if our player is standing at position (x = 5, y = 6) and we add Vector2.UP to that position vector, it will have the coordinates (x = 5, y = 6 + (-1)) = (x = 5, y = 5). That is equivalent to moving our player up by one position in our coordinate system. You might ask, why we did not simply take the player’s y coordinate and added 1 to it. That is a fair question, since the above calculations seem to be more complicated. But in fact these vector calculations will keep our code simpler, shorter and less error prone. You will see that this more general vector operations will save us writing several if-else statements checking for the movement direction and handling each case separately.
With this mapping in place we can generate the vector we have to add to the player’s position vector in order to move as desired:
We get the corresponding direction vector directionVec. Then we clone it and multiply it with the previously calculated pixelsToWalkThisUpdate. We need to clone the vector, because multiply() is a mutating operation. Now we have a freshly baked movementDistance vector that we just need to add to the current player position in order to move the player.
If you run the code now and press any arrow key, you will observe that our player continues to move into the first direction you wanted… and never stops.
This is because we did not yet end a movement. Let’s for now end a movement after every update:
If you run the game now you should be able to move the player around the map!

So far so good, but this is about grid movement. And right now you can move the player only pixel based. So let’s head over to implementing the grid movement.
Grid Movement
A first step to grid based movement is to ensure that the player can’t stop between two tiles. To achieve that we will first do a small refactoring and move the code to actually move the player sprite into it’s own method:
Now to ensure that a player always stops at a tile border we need to do two things: we need to detect when the player would exceed the tile border and limit the pixelsToWalkThisUpdate to match the end of the tile. Then we can stop the movement exactly there.
Therefore we first need to track how many pixels of a tile have already been walked. We track this with a variable called tileSizePixelsWalked:
We update the value after every update of the player position by adding the pixelsToWalkThisUpdate. The value of tileSizePixelsWalked can never be larger than the tile size. In fact it should start with 0 again if the tile size was exceeded. Therefore we set it modulo GameScene.TILE_SIZE at the end.
Now we can introduce a helper method that helps us detect whether the player will finish a tile movement this update:
With this method in place we have everything we need to implement the grid movement:
We adapt updatePlayerPosition() such that we first check whether the player would head over to the next tile this update. If so we only move it the rest of the current tile and stop the movement. Otherwise we simply move the sprite by pixelsToWalkThisUpdate.
If you run the game now, you will see that we are already able to only move in whole tiles:

Improving the Movement
There is one little flaw in this implementation. On an update that will move our player to the next tile, we only move to the end of the current tile. Therefore we are moving less pixels than on the other updates and our movement may look not very fluid. If we want to continue the movement into one direction, there is actually no need to stop at the tile border.
In order to fix this, we first need a method to detect whether the player would like to keep moving into the same direction after the current update. We do this by introducing a variable lastMovementIntent that is set on every call of the movePlayer() method with the corresponding direction. So even if the player is currently moving and we call movePlayer() we save the last movement intent. After every update we reset it to Direction.NONE. To check whether the player wants to continue walking into the same direction after crossing the tile border this update, we simply check whether lastMovementIntent equals the current movement direction:
Add Walking Animations
We start by creating walking animations for each direction in our main.ts:
We provide the corresponding frame indexes from our characters spritesheet. We set a frame rate of 10 frames per second and make the animation repeat forever (or until we manually stop it). By setting yoyo to true we make sure that the animation will replay in reverse order every time it finished. In our case we have an animation frame for each foot: left foot, standing and right foot. If we just repeated the animation without setting yoyo to true the order would be: left foot, standing, right foot, left foot, standing, right foot, left foot …
With yoyo enabled the order is: left foot, standing, right foot, standing, left foot, standing, right foot …
The following animation demonstrates the desired order of frames:

The next step is to provide methods in our Player class that allow playing the corresponding animations:
stopAnimation() will simply stop whatever animation is currently playing on the sprite. startAnimation() will start playing a walking animation for the corresponding direction.
Now we simply need to call those methods at the right places:
If we run the game now, we will see that the animations work. However, when we stop, we sometimes stop on the left or right foot. So we want to adapt our code a bit, such that we always stop standing:
First, we check if there is any walking animation running. If so, we get the name of the frame that represents a standing player. We know that each animation consists of three frames. The middle one is the standing frame. Therefore we take the second (index 1) element from the frames array.
Next, we stop the current animation and then set the frame of the sprite to the corresponding standing frame.
If we run the game now, we can see that the animations work as expected.

Handle Collisions
In order to detect collisions on a tile level we need to give our player a tile position:
We simply get and set the tile position we already pass to the player on creation. We use clones so we don’t run into mutation issues.
Next, we set the tile position correctly in our physics engine:
We introduce a helper method updatePlayerTilePos() that updates the tile position according to the current movement direction. We call it whenever we start a movement. We also call it, when we continue a movement. This is the case if we will reach the end of the tile in the current update but we signaled a further movement intent, so that we will move on to the next tile. Therefore we needed to change our updatePlayerPosition() method a bit such that it can detect three cases:
- Player will not reach the end of the tile this update: simply move the player
- Player will reach the end of the tile this update but wants to move further: move the player and update tile position
- Player will reach the end of the tile this update but wants to stop or change direction: move the player until the end of the tile
But what about collisions now? We prepared everything to actually check for collisions.
We will now pass the tilemap to our physics engine in order to check tiles for the collision property:
We introduce a helper isBlockingDirection() that can detect if the tile at the current direction is blocked for the player:
First we use the helper tilePosInDirection() to get the position of the tile in the corresponding direction. Next we check if that tile is blocking by calling hasBlockingTile(). This method first checks if there is no tile at all at the position. If so we always return true. This way we make sure that our player collides with the borders of the map. If there is a tile we check the tile at the corresponding position on all the tilemap layers for the collision property. If it is true on at least one layer, we consider the tile as blocking.
As a last step we need to use isBlockingDirection() at the right positions in our code:
We update shouldContinueMoving() such that it also checks for a blocking tile.
We also use it in movePlayer() to make sure that we only move the player if the direction is not blocked. If it is blocked though, we stop an animation in the direction that the player “wanted” to move. This will just turn the character sprite towards the blocked direction. To do this we also need to update our stopAnimation() method to take the direction as an argument:
That’s it! If you run the game now you should have an animated grid-based movement with tile-based collisions:
Conclusion
While the concept of such a movement seems easy at first, the details can get tricky. I hope I could explain my approach for a grid-based movement implementation to you.
You can access the whole code here:
https://github.com/Annoraaq/grid-movement
My Phaser 3 plugin that makes reusing this functionality a piece of cake can be found here: https://github.com/Annoraaq/grid-engine
Feel free to take it as a base for your own game.
Enjoy coding 👾

